ROS2 Setup
In the ROS2 Architecture xicro-package and calibration-package is required to perform system integration between microcontroller and ROS2. The aim is to output navigation related message to navigation node and bring command from that node to microcontroller for robot movement. The first thing to do is installing both packages and setup microcontroller in ROS2.
Calibration and Xicro Installation
1. Install python library
We need to install Xicro’s related library first in order to communicate with microcontroller via serial port. In the terminal, type these commands to install python libraries.
pip3 uninstall serial
pip3 install pyserial
pip3 install numpy
2. Clone package from Github
Go to Firmware-Team’s Github then clone xicro-package and
calibration-package from Xicro-ROS2 branch to your workspace/src
In the workspace/src directory, run the following command:
git clone https://github.com/MBSE-2022-1/Firmware-Team/tree/Xicro-ROS2
3. Give permission to all python scripts in both packages
In the workspace/src/Firmware-Team-Xicro-ROS2/Xicro/xicro_pkg/scripts and workspace/src/Firmware-Team-Xicro-ROS2/calibration/calibration/scripts
, run the following command:
chmod 777 *
4. Build the workspace with colcon
In the workspace/src directory, you can now build both packages using the command:
colcon build
Note
After build packages, you can now source your files with source ~/workspace/install/setup.bash command or write this
command in your .bashrc. So every time you open terminal system will automatically source files for you.
5. Start using xicro and calibration scripts
You can now use python scripts in both packages scripts directory to open related nodes.
ros2 run xicro_pkg xxx.py
ros2 run calibration xxx.py
Hardware Setup
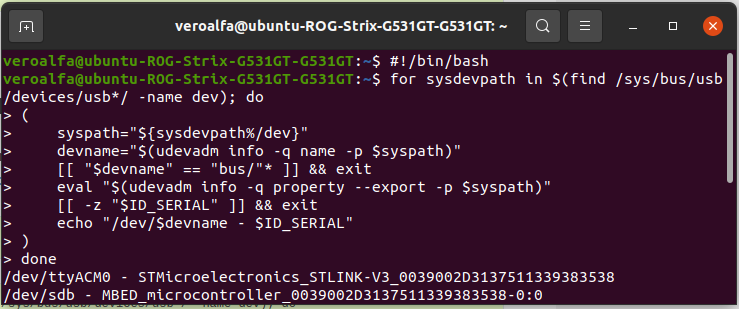
1. Find microcontroller device dev path
After connect your microcontroller to ROS2 via usb port, run the following command to find device dev path of microcontroller:
#!/bin/bash
for sysdevpath in $(find /sys/bus/usb/devices/usb*/ -name dev); do
(
    syspath="${sysdevpath%/dev}"
    devname="$(udevadm info -q name -p $syspath)"
    [[ "$devname" == "bus/"* ]] && exit
    eval "$(udevadm info -q property --export -p $syspath)"
    [[ -z "$ID_SERIAL" ]] && exit
    echo "/dev/$devname - $ID_SERIAL"
)
done
You can now see that microcontroller stlink’s path is /dev/ttyACM0.
2. Open microcontroller usb port
Every time when connecting microcontroller to ROS2, you need to run this command to open usb port. Otherwise xicro node can not connect to your microcontroller.
sudo chown $USERNAME /dev/ttyACM0